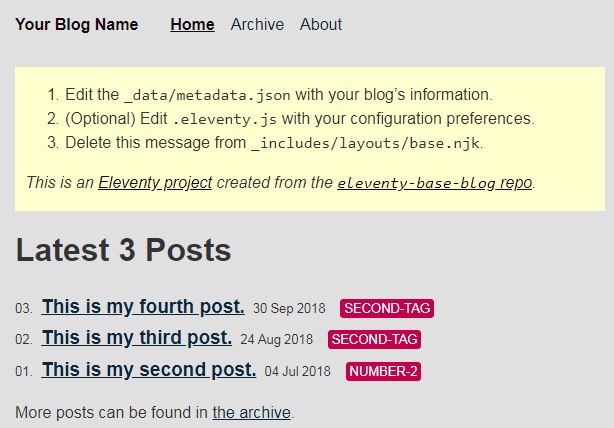
I started down this road after a simple engagement on Twitter with Brob and he suggested that I start blogging on dev.to and even went so far as to say that I should think about posting to my own site and syndicating over dev.to. At that point I had a custom domain without any clue what to do with it.
But How
Luckily Brob went on to direct me here for a straight forward tool that can publish a personal blog using GitHub Pages and TravisCI. The instructions are really easy and after having setup my custom domain through GitHub Pages already, I had this 'up and running' within an hour. This is where is really stalled for a while. At this point I had my build process up and running and could view the sample blog from my custom url.

Get Started
Letting this thing go stagnant for too long made it feel progressively harder to get done. The page gives clear instruction on first steps.
- Edit the _data/metadata.json with your blog’s information.
- (Optional) Edit .eleventy.js with your configuration preferences.
- Delete this message from _includes/layouts/base.njk.
Edit _data/metadata.json
{
  "title": "Your Blog Name",
  "url": "https://myurl.com/",
  "description": "I am writing about my experiences as a naval navel-gazer.",
  "feed": {
    "subtitle": "I am writing about my experiences as a naval navel-gazer.",
    "filename": "feed.xml",
    "path": "/feed/feed.xml",
    "url": "https://myurl.com/feed/feed.xml",
    "id": "https://myurl.com/"
  },
  "author": {
    "name": "Your Name Here",
    "email": "youremailaddress@example.com"
  }
}
This stuff is really easy. I'm starting to feel ashamed of having waited so long to work on this. All of the data here can be put together inside of 5 minutes.
Delete this message from _includes/layouts/base.njk
    <main class="tmpl-post">
      <div class="warning">
        <ol>
          <li>Edit the <code>_data/metadata.json</code> with your blog’s information.</li>
          <li>(Optional) Edit <code>.eleventy.js</code> with your configuration preferences.</li>
          <li>Delete this message from <code>_includes/layouts/base.njk</code>.</li>
        </ol>
        <p><em>This is an <a href="https://www.11ty.io/">Eleventy project</a> created from the <a href="https://github.com/11ty/eleventy-base-blog"><code>eleventy-base-blog</code> repo</a>.</em></p>
      </div>


    </main>
Hack off that one div. Again I'm not sure what I was expecting to be difficult in this setup.
About
In order to customize the "About" page that is linked in the top nav pane you will need to edit about/index.md. While the markdown spec is prolifically generic, if you have any experience with using markdown on Reddit, Discord, or GitHub then it is pretty easy to use. Personally I am writing this through IntelliJ Community Edition with Markdown Support plugin and I'm able to see the output in realtime. Put in some basic information that you would like to be displayed on your page.
Start Blogging
After getting these things all completed you can start writing your first blog entry. I'm writing this entry as I complete the work that I'm describing. While working I have Eleventy running as npx eleventy --server --watch so that the build picks up whatever changes I make and automatically serves them for viewing in the browser (I'd hate to be publishing this without first testing that it works).
While writing this post I was able to get an image included using the included html templating language with <center><img src="/img/Generic11ty.bmp"/></center>
Creating tags for your posts is as easy as adding them in the heading of the markdown file after the default of 'post'.
title: Customizing 11ty Blog
description: Cleaning up after forking
date: 2019-08-13
tags:
  - post
  - 11ty
  - travisci
  - meta
layout: layouts/post.njk
Still a work in progress
At this point I have gotten the blog up and running with my custom information so that it feels more like mine and less like some code that I forked and forgot about. While I'm not exactly a frontend developer, I plan on sharing my future work on some custom css as well as my online resume generator.