Hacktoberfest with GitKraken
hacktoberfest git gitkraken opensourceIntroduction to Open Source using GitKraken
In the software development community October brings Hacktoberfest, a month long event centered around getting more people involved in the open source community. If you aren't familiar with the event you can see my previous article here.
In order to contribute to open source projects, typically you will be asked to submit a pull/merge request (PR/MR) with the changes that you've made in order to get those changes into the main project. While there are many great resources to learn git from command line (like this one), many of us find visualization tools for Git to be a tremendous help. I use GitKraken and love it. So I would love to demonstrate how to use this tool to make your first contribution to open source.
Terms
For the ease of discussion, I'd like to cover basic terms and their common usage. A repository is the root directory (and everything inside) that git is tracking for a project. It is most typical that for a small project that you would have one 'remote' location attached. A remote can be GitHub, GitLab, or even just another computer that you have access to. A remote isn't actually required, git can be used to track changes just in your computer. The default remote for a repository is typcally called origin, and when you have a fork this would be the fork on GitHub or GitLab usually. The original repository that you forked from is referred to as upstream.
Getting Started
The first steps that you will want to do will be to install GitKraken, and connect to the git provider system that you plan on using. GitKraken has integrations with both GitHub and GitLab that will allow for the easiest level of interaction with those sites through the GitKraken client. I find it best to utilize SSH keys regardless of how I interact with git and the provider as it is more secure than simply saving username and password.
After you have your client configured and a project found then you will need to fork the original repository. This can be done through GitKraken. First you open the repository, and if the client doesn't detect an existing fork of the project in your account it will present a button to easily do so. Alternatively, if you already have a fork of the project then you can open your fork, and then add a remote to the project to the original project.
Long term usage
One of the things that is most difficult with maintaining a fork over longer periods is getting the upstream changes into your fork from the original repository. I've talked to professional developers that habitually delete their fork and create a new one to get the changes from upstream. This gets the job done, but is ultimately unnecessary.
The first thing that you'll need to do is fetch all.

You can see here that my local is behind upstream by 11 commits. In order to remedy this, I only need to rebase my local on upstream.
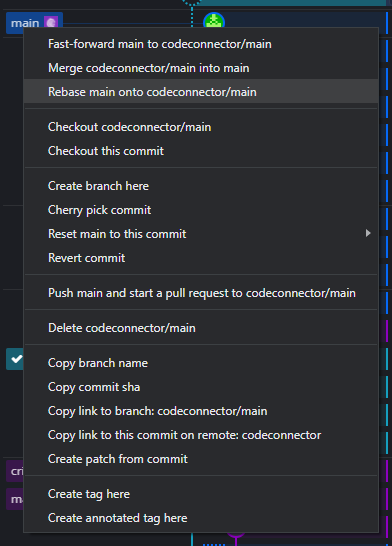
While I have my local main branch checked out, I just need to right click on the upstream branch that has the changes I want, and select "Rebase [mine] onto [other]". this can be done before or after having made commits as rebase will move your changes to be after the ones in that remote branch.
Now the next step that I do isn't 100% necessary, but a good practice to get into
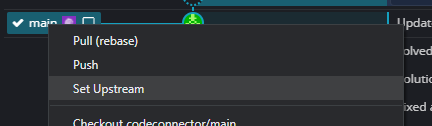
In order to ensure that I'm pushing to my fork and not the upstream remote, I will check my "set upstream". Before I started doing this step, I would habitually push to upstream when I had intended to open a pull request. This isn't typically an issue as push access is usually restricted to maintainers and owners.
